


|
||||||||


 |
|
|
Thread Tools | Search this Thread |


Join Date: Aug 2013
Posts: 567
 |
Welcome back, aspiring cyberwarriors. In this article, one of our fighters in Ukraine (Sierra) demonstrates how they use social engineering to turn Russian tactics against them.
In each new article here, we delve into the cyberwarrior wisdom of Master OTW and its application in cyber warfare. In this edition, I will discuss Master OTW's strategy of: “Turning the power and strength of your opponent against them” in reference to phishing campaigns. In the digital realm, Russian hacker groups are known for their sophisticated attacks, many of which involve social engineering techniques. In this article, we will examine how to turn the Russian social engineering attacks and techniques against them.  Solution To address these challenges, we can entice the user to transition from a secure workspace to a phishing resource on a personal device by including a QR code in the email. This approach tackles two issues simultaneously:
Let's examine this solution in more detail. Step # 1: Search for the Victim's Email Addresses Before executing any attack, the first step is always reconnaissance. In this case, our primary objective is to gather the email addresses of individuals within the target company. For example, if we are targeting one of Russia's largest retail and hypermarket chains, Lenta, we need to analyze their website to identify how corporate email addresses are structured. In this instance, it appears that their email addresses are composed of the employee’s first and last name.  The company is also registered on LinkedIn. Let's take advantage of it.  First, let’s search for a list of the company’s employees. Crosslinked can assist us with this task. While it is possible to perform this manually, using Crosslinked will save us many hours of tedious work. It’s important to note that this tool utilizes search engine scraping to collect valid employee names, avoiding the need for API keys, credentials, or direct access to LinkedIn. To install: kali> git clone https://github.com/m8sec/crosslinked kali> cd crosslinked kali> pip3 install . With the Crosslinked script installed and set up, we can now search for employees at Lenta. To do this, we need to specify the name format and the company name. kali> ./crosslinked.py -f '{first}.{last}@lenta.com' lenta Where: “-f ” specifies the format for the email names. “{first}.{last}@company.com” is the email format we are using. “lenta” is the name of the company we are targeting.  In the names.txt file, you can view the results found, including the email address that was specified on the website. 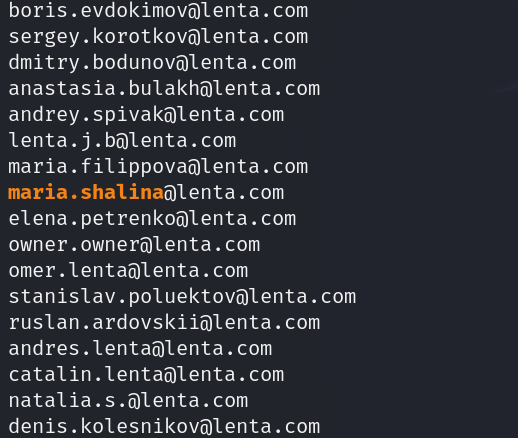 Another great OSINT resource is Hunter.io. Here’s a brief overview of its core features:
 Step # 2: Fire up GoPhish Now that we have gathered email addresses, it’s time to move on to the phishing aspect of this attack. According to reports, Russian hackers frequently use GoPhish for their campaigns. GoPhish is an open-source phishing toolkit that enables users to create and manage phishing campaigns, track responses, and analyze results. We’ll take it a step further by integrating GoPhish with Evilginx. This integration enhances our phishing campaigns by sending emails containing valid Evilginx lure URLs while utilizing GoPhish's user interface. Please note that we will only cover the basic aspects of this software. Here’s a look at some key advantages of integrating GoPhish with Evilginx:
First, deploy GoPhish on an external server. It doesn't need to be the same server where Evilginx is running, but it must be reachable by your Evilginx instances. To get started, download the modified version of GoPhish provided by kgretzky: server> wget https://github.com/kgretzky/gophish/releases/download/v0.12.1/gophish-v0.12.1-linux-64bit.zip Unzip the downloaded file: server> unzip gophish-v0.12.1-linux-64bit.zip  Open the config.json and change the listener URL from localhost to 0.0.0.0 to make the admin panel externally accessible. You can also change the port here. Make the script executable and run it: server> chmod 755 gophish server> ./gophish This will start the built-in GoPhish server. Once it is running, you should see a line in the output informing you of the default credentials for your instance. The username is admin and the password is a random string of characters.  GoPhish's popularity stems from several key factors that make it a preferred choice for phishing:
Due to the combination of all these factors, it has become quite popular, including among Russian hackers. Step # 3: Configuring Evilginx Previously, Aircorridor showed how to install Evilginx. Therefore, I’ll assume you’re already familiar with the installation process. We’ll now move on to integrating GoPhish with Evilginx. For this, you will need the admin URL of your GoPhish instance and the API key. You can find the API key within the “Account Settings” in your GoPhish admin panel.  Commands on a server running Evilginx: :config gophish admin_url https://1.2.3.4:3333 :config gophish api_key 12345 If you do not use a valid TLS certificate for the exposed GoPhish instance, you may need to allow insecure TLS connections as well (note: Insecure TLS connections can expose you to man-in-the-middle attacks, so proceed with caution): : config gophish insecure true Test the communication with GoPhish: : config gophish test  Step # 4: Configuring GoPhish in a Training Environment To send emails, GoPhish requires you to configure SMTP relay details, referred to as 'Sending Profiles.' For training purposes, I will use the SMTP settings for Outlook. It's quite simple. We just need to specify the sender's email address, along with the host, port, and password.  To test your SMTP configuration, click 'Send Test Email.' If everything is set up correctly, you will receive an email as below:  Next, create an email template by clicking Email Templates in the left sidebar and clicking New Template. In the new template window, create a template to be used for your campaign: The sender should specify their name and email address in angled brackets in the form. Next, craft compelling text to encourage the recipient to click on the link; I'll use a classic technique for this. When creating a template, it is important to use variables. For example, in a subject line, you might use something like: "Password Reset for {{.Email}}." Similarly, for URLs, you would use: {{.URL}}. After that, add a list of email addresses to the 'Group.' Once that's done, you can create a new campaign.  Everything here is intuitive: just fill out the form and wait for the email to be sent.  Voil?! The email has been successfully delivered. In GoPhish, we can monitor which emails have been opened and whether the link has been clicked.   Subsequently, if the user enters their access credentials, we will be able to observe it in Evilginx. Subsequently, if the user enters their access credentials, we will be able to observe it in Evilginx.  GoPhish will notify us as well.  Recommendation You can connect your domain to CloudFlare, which allows you to make DNS changes that typically propagate within minutes rather than the usual 2 to 24 hours. Additionally, you can enable traffic proxying to obscure the real IP address of your servers, and use CloudFlare's SSL certificates instead of those from Let's Encrypt. Step # 5: Generate QR-code At this stage, you might wonder how to insert a QR code into an email. There are several options:
To generate a QR code using HTML, you'll need to utilize a QR code generation service or library. For simplicity, we will use a free online QR code generator, qr-code-generator.com. Here's a URL format you can use to create a QR code: https://api.qrserver.com/v1/create-qr-code/?size=150x150&data=https://fake.com Use the generated QR code URL to embed the image in your HTML email. Below is a basic example of HTML code for embedding the QR code in an email: QR Code As a result, a valid QR code will be sent to the email address.  Now we have a working method of delivering emails with a QR code. Smartphones easily read it and open the GoPhish authorization form. Step # 6: Building a mailing scenario We need a convincing reason for users to scan a QR code with their smartphones and enter their data. Analyzing Google Trends, we see that most searches are related to the Ukrainian army's attack on the Kursk region (Ukraine recently invaded the Kursk oblast in Russia). Let's leverage this topic.  This is how the script for the Telegram bot was created to support people affected by the 'special military operation'—a term used by Russian propaganda to describe the war against Ukraine.  Translation: “Citizens of Russia! As part of our large-scale digital transformation, we are pleased to introduce you to our new service - a Telegram bot to support families of victims of a special military operation. Applying to this bot will allow you to promptly resolve issues related to monetary allowances, search for missing persons, as well as compensation in case of death of relatives. A feature of the bot is the cooperation of the Ministry of Labor and Social Protection of the Russian Federation, volunteers and the analytical group "Space 121". To access the bot: Scan the QR code from your cell phone. Or enter the following link in your browser: https://t.me/123. Follow the link in Telegram and authorize in the system. Ask questions to our staff in the format: /support Your question. Regards, Support Service” Final Steps Our main goal is to get users to visit the bot and enter their access data. Therefore, the simplest approach is to inform them that authorization is required to use the bot. To create a bot, you need to go to the 'BotFather,' a special bot for registration, and obtain an API key. The process of creating the bot itself, using artificial intelligence, took about 10 minutes. While it's not perfect, it is functional.  Run this script: kali> pip install python-telegram-bot kali> python3 bot.py  Message translation from Russian to English: “Welcome to Telegram bot for supporting citizens affected by special military operation. Authorize at the link: Here After authorization is complete, use the /support command to ask a question.” As you can see from the code, the "Here" is a regular link within the HTML tag. It will point to our authorization form created by Evilginx. After running the final checks, we can start sending out emails. About 15 minutes after the mailing began, I noticed the first email was opened. Summary Knowledge of your adversary's techniques is essential for victory in the cyber warfare. We must be willing to seek knowledge from all sources, but especially from the minds of those we oppose. This article serves as a single instance, the social engineering methodology holds immense potential for sophistication. The boundaries of its application are defined only by the breadth of our imagination and the depth of our commitment.
__________________
Advertising Policies |

|

|
|
«
Previous Thread
|
Next Thread
»
| Thread Tools | Search this Thread |


|
|

 Similar Threads
|
||||
| Thread | Thread Starter | Forum | Replies | Last Post |
| The Art and Science of Social Engineering in the Age of AI, February 11-13 | Cartographer | News | 0 | 02-04-2025 07:34 PM |
| Bluetooth Hacking: Using Bettercap for BLE Reconnaissance and Attacks! | Cartographer | News | 0 | 02-04-2025 04:35 PM |
| Social Monster - современная программа для продвижения в Instagram | MarthaAtony | Непроверенная реклама | 0 | 02-28-2020 11:20 PM |
| Best service of DDOS attacks! | MakeEasy | Unverified Advertising | 11 | 08-07-2017 09:59 PM |
| [ПРОДАЖА] Сканов - Passports | Driver Licenses | IDs | Social Security | defeated | Реальный кардинг | 1 | 10-07-2015 11:49 AM |